Extend the default scorecards
Scorecards can track more than pass or fail compliance. By extending their data models and using automations, you can build SLA aware workflows and visual dashboards that help teams stay accountable and proactive.
This page demonstrates real-world examples of how to do that. From extending the scorecard data model to automating SLA management and adding self-service actions that make scorecards truly actionable.
Extend the data model
The scorecard blueprints (Scorecard, Scorecard rule, and Scorecard rule result) can be extended with additional properties to support more advanced use cases.
In this example, we are going to add the following properties:
- Due date - Track when a rule or rule result needs to be addressed. This property can be automatically updated by automations based on business logic.
- SLA (Service Level Agreement) - Define the expected time to remediate issues identified by a rule, enabling SLA tracking and compliance monitoring.
- Hours until SLA due date - A calculation property that dynamically calculates the time remaining until the SLA due date, useful for triggering reminders and tracking approaching deadlines.
To create a new property:
-
Navigate to the Builder page of your portal.
-
Expand the blueprint you want to edit, for example the scorecard rule blueprint.
-
Click on the
+ New propertybutton. -
Choose the relevant type.
-
Fill in the form with the desired property details.
-
Click
Create.
Extended scorecard rule blueprint
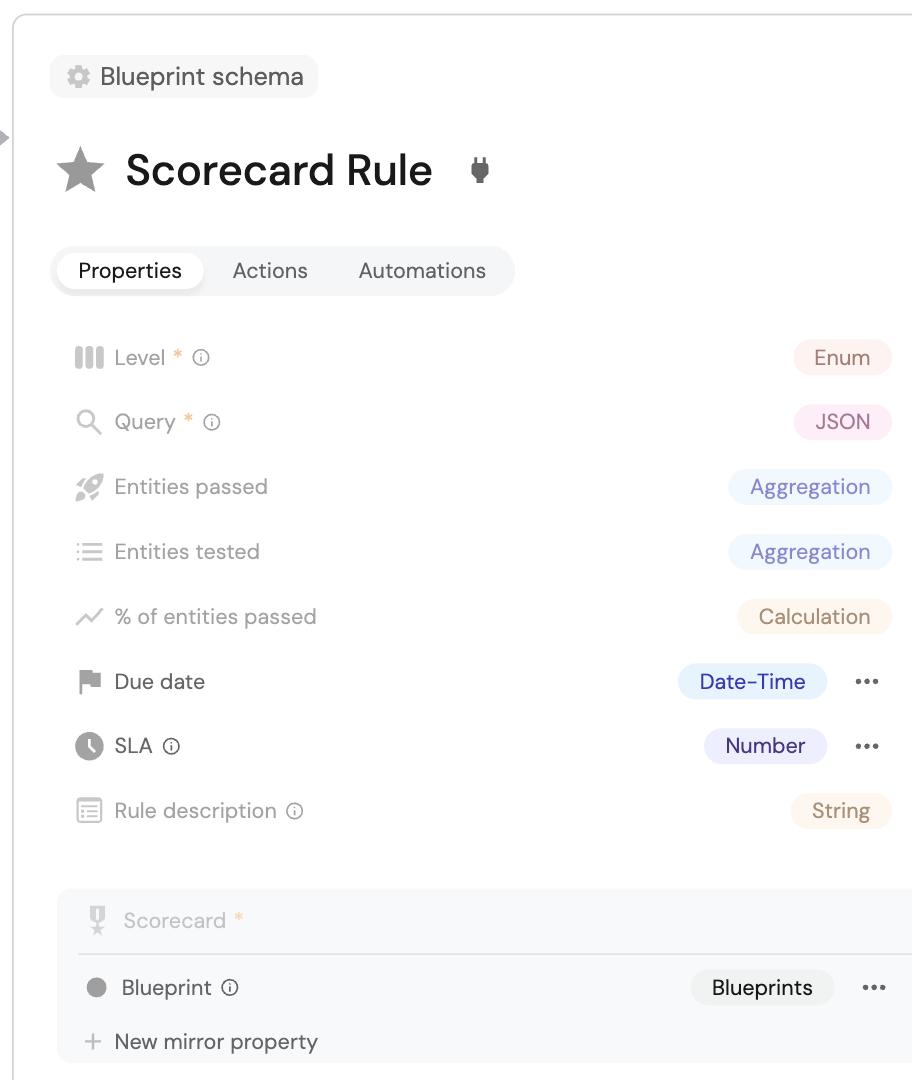
The following example shows an extended Scorecard rule blueprint with additional properties including Due date and SLA:
Due date property definition (click to expand)
For the Due date property, fill in the form with following details:
- Type: Date & time.
- Title: Due date.
You can also edit the blueprint's JSON form by clicking on the ... in the top right corner of the blueprint, then choosing Edit blueprint.
Copy and paste the following JSON snippet under the properties section.
"schema": {
    "properties": {
        "due_date": {
            "title": "Due date",
            "icon": "Flag",
            "type": "string",
            "format": "date-time"
      }
    }
}
SLA property definition (click to expand)
For the SLA property, fill in the from with following details:
- Type: Number.
- Title: SLA.
- Description: Days to remidate action item.
You can also edit the blueprint's JSON form by clicking on the ... in the top right corner of the blueprint, then choosing Edit blueprint.
Copy and paste the following JSON snippet under the properties section.
"schema": {
    "properties": {
        "sla": {
            "type": "number",
            "title": "SLA",
            "description": "Days to remediate action item ",
            "icon": "Clock"
            }
    }
}
After adding these properties, your blueprint should look like this:
Extended scorecard rule result blueprint
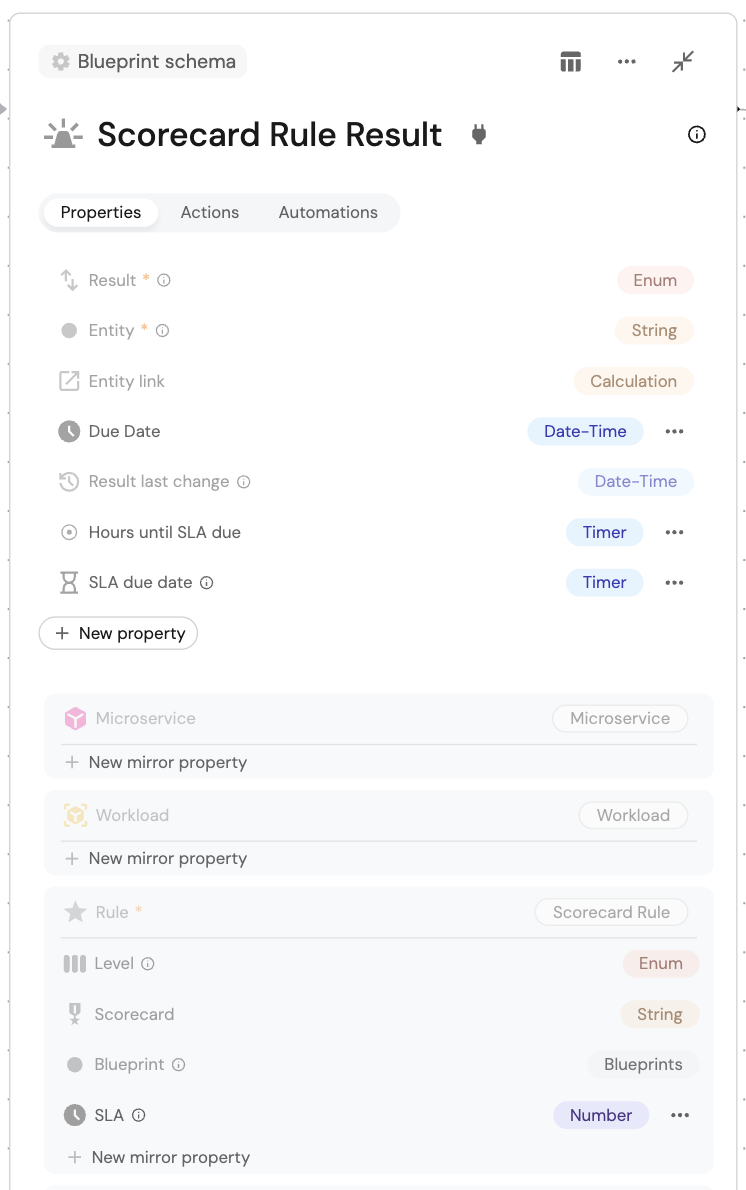
The following example shows an extended Scorecard rule result blueprint with additional properties including SLA due date, Due date, Hours until SLA due date as well as the SLA mirror property:
SLA due date property definition (click to expand)
For the SLA due date property, fill in the from with following details:
- Type: Timer.
- Title: SLA due date.
- Description: Time to remediate based based on the SLA.
You can also edit the blueprint's JSON form by clicking on the ... in the top right corner of the blueprint, then choosing Edit blueprint.
Copy and paste the following JSON snippet under the properties section.
"schema": {
    "properties": {
        "sla_due_date": {
            "type": "string",
            "title": "SLA due date",
            "description": "Time to remediate based based on the SLA ",
            "icon": "HourGlass",
            "format": "timer"
      }
    }
}
Due date property definition (click to expand)
For the Due date property, fill in the form with following details:
- Type: Date & time.
- Title: Due date.
You can also edit the blueprint's JSON form by clicking on the ... in the top right corner of the blueprint, then choosing Edit blueprint.
Copy and paste the following JSON snippet under the properties section.
"schema": {
    "properties": {
        "due_date": {
            "title": "Due date",
            "icon": "Flag",
            "type": "string",
            "format": "date-time"
      }
    }
}
Hours until SLA due date property definition (click to expand)
For the Hours until SLA due date property, fill in the form with following details:
- Type: Timer.
- Title: Hours until SLA due date.
You can also edit the blueprint's JSON form by clicking on the ... in the top right corner of the blueprint, then choosing Edit blueprint.
Copy and paste the following JSON snippet under the properties section.
"schema": {
    "properties": {
        "hours_until_sla_due_date": {
            "type": "string",
            "title": "Hours until SLA due date",
            "format": "timer"
      }
    }
}
SLA mirror property definition (click to expand)
For the SLA mirror property, fill in the form with following details:
- Type: Mirror.
- Title: Due date.
- Relation: Rule.
- Mirror from: Scorecard rule.
You can also edit the blueprint's JSON form by clicking on the ... in the top right corner of the blueprint, then choosing Edit blueprint.
Copy and paste the following JSON snippet under the properties section.
"schema": {
    "mirrorProperties": {
        "sla": {
            "path": "rule.sla"
        }
    }
}
After adding these properties, your blueprint should look like this:
Automate SLA tracking
With the data model extended, automations can enforce and monitor SLA timelines automatically.
Let’s look at two examples:
Set action item due date
When a scorecard rule fails (changes from Passed to Not passed), this automation sets the SLA due date and Hours until SLA due properties on the rule result based on the SLA defined on the rule. This ensures that action items have a clear deadline for remediation based on the rule's SLA requirements, and enables timer-based reminders when the deadline approaches.
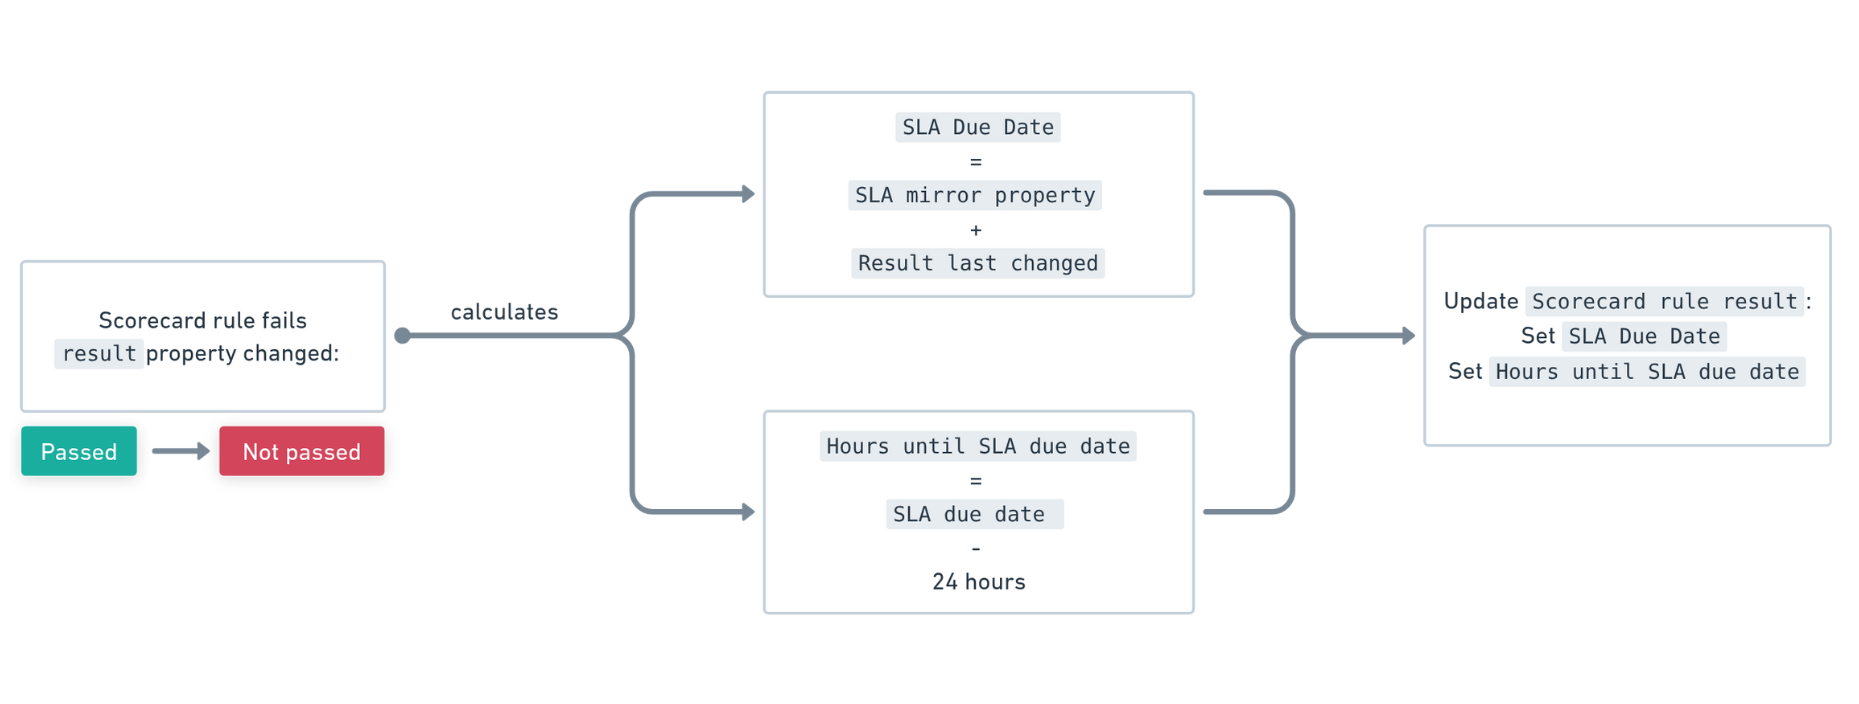
The automation triggers when a rule result's result property changes from "Passed" to "Not passed".
The SLA due date value is calculated by:
- Taking the SLA value (in days) from the rule.
- Converting it to seconds (multiplying by 24 * 60 * 60).
- Adding it to the
result last changetimestamp (when the rule failed). - Converting the result to a date-time format.
The Hours until SLA due property is set to 24 hours before the SLA due date, creating a timer property that expires when the reminder should be sent. This timer is used by the reminder automation to trigger notifications when action items are approaching their SLA deadlines.
Automation definition (click to expand)
{
  "identifier": "set-action-item-due-date",
  "title": "Set action item due-date",
  "description": "When a requirement fails, set a due date to it's action item based on the SLA defined on the requirement",
  "icon": "HourGlass",
  "trigger": {
    "type": "automation",
    "event": {
      "type": "ENTITY_UPDATED",
      "blueprintIdentifier": "_rule_result"
    },
    "condition": {
      "type": "JQ",
      "expressions": [
        ".diff.before.properties.result == \"Passed\"",
        ".diff.after.properties.result == \"Not passed\"",
        ".diff.before.properties.result_last_change != .diff.after.properties.result_last_change"
      ],
      "combinator": "and"
    }
  },
  "invocationMethod": {
    "type": "UPSERT_ENTITY",
    "blueprintIdentifier": "_rule_result",
    "mapping": {
      "identifier": "{{ .event.context.entityIdentifier }}",
      "properties": {
        "sla_due_date": "{{((.event.diff.before.properties.sla * 24 * 60 * 60) + ( .event.diff.after.properties.result_last_change | split(\".\")| .[0] | . + \"Z\" | fromdate)) | todate}}",
        "hours_until_sla_due_date": "{{(((.event.diff.before.properties.sla * 24 * 60 * 60) + ( .event.diff.after.properties.result_last_change | split(\".\")| .[0] | . + \"Z\" | fromdate)) - (24 * 60 * 60)) | todate}}"
      }
    }
  },
  "publish": true
}
This automation creates a timer that counts down to the remediation deadline. The timer can be displayed in dashboards to track SLA compliance, and it can also be used by other automations, such as the reminder automation below, to notify developers when the due date is approaching.
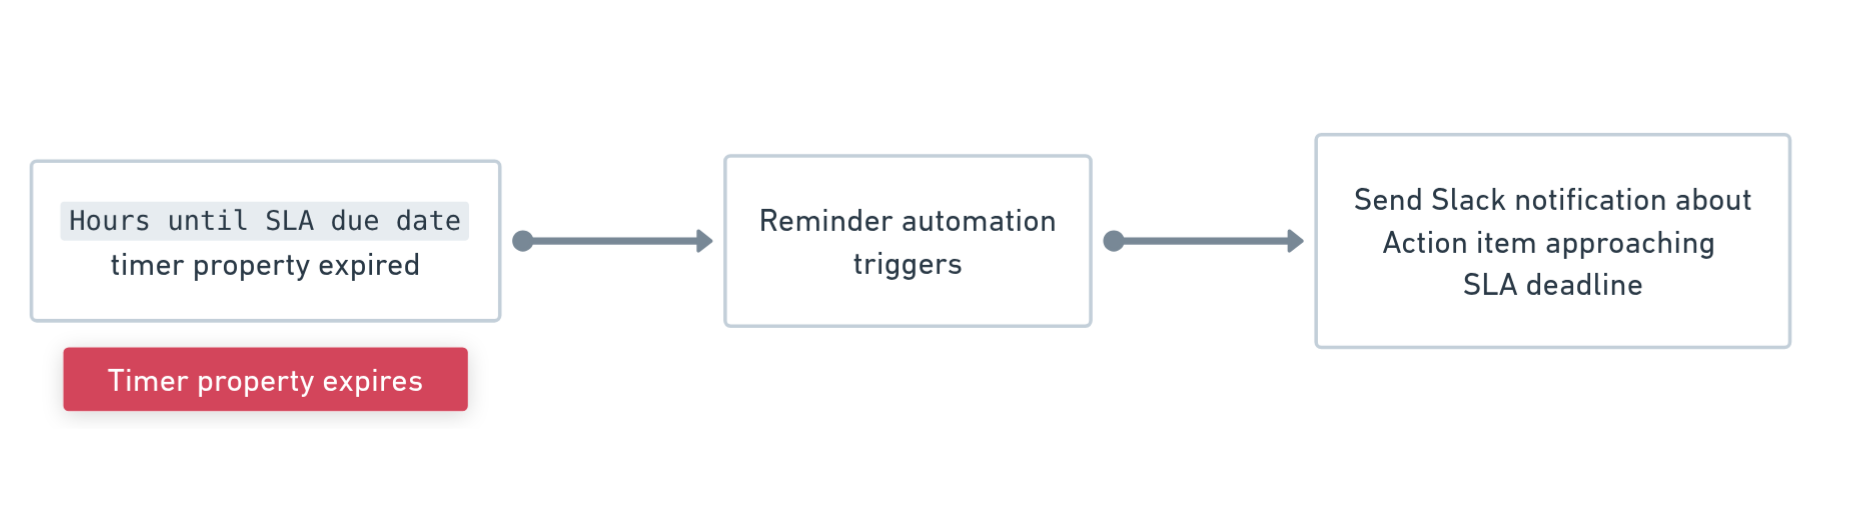
Send reminder for upcoming due dates
Once SLA due dates are set, you can add another automation to send reminders when deadlines approach. This uses the calculation property Hour until SLA due to detect when an item is within 24 hours of expiration.
Automation definition (click to expand)
{
  "identifier": "send_reminder_for_upcoming_due_date",
  "title": "Send reminder for upcoming due date",
  "description": "Sends a reminder when an action item is approaching its SLA due date (within 24 hours)",
  "icon": "HourGlassExpired",
  "trigger": {
    "type": "automation",
    "event": {
      "type": "TIMER_PROPERTY_EXPIRED",
      "blueprintIdentifier": "_rule_result",
      "propertyIdentifier": "hours_until_sla_due_date"
    },
    "condition": {
      "type": "JQ",
      "expressions": [
        ".diff.after.properties.result == \"Not passed\""
      ],
      "combinator": "and"
    }
  },
  "invocationMethod": {
    "type": "SLACK",
    "url": "https://hooks.slack.com/services/YOUR-WEBHOOK-URL
    "agent": false,
    "synchronized": true,
    "body": {
        "text": "⚠️ *Action Item SLA Due Date Reminder*\n\nThis is a reminder that an action item's SLA due date is approaching within 24 hours.\n\n*Action Item Information:*\n• *Rule Result Identifier:* {{ .event.context.entityIdentifier }}\n• *Blueprint:* {{ .event.context.blueprintIdentifier }}\n\n*Required Action:*\nPlease review and address this action item promptly to ensure SLA compliance. The action item requires remediation to meet the defined service level agreement.\n\nYou can view the complete action item details and related information in your Port catalog at: https://app.getport.io{{ .event.diff.after.properties.entity_link }} you have any questions or need assistance, please contact your team lead or the responsible party for this action item."
    },
    "method": "POST",
    "headers": {}
  },
  "publish": true
}
Handle SLA exceptions
Not all action items can be resolved before their SLA expires. With the following self-service action, teams can request a due date extension directly from the catalog.
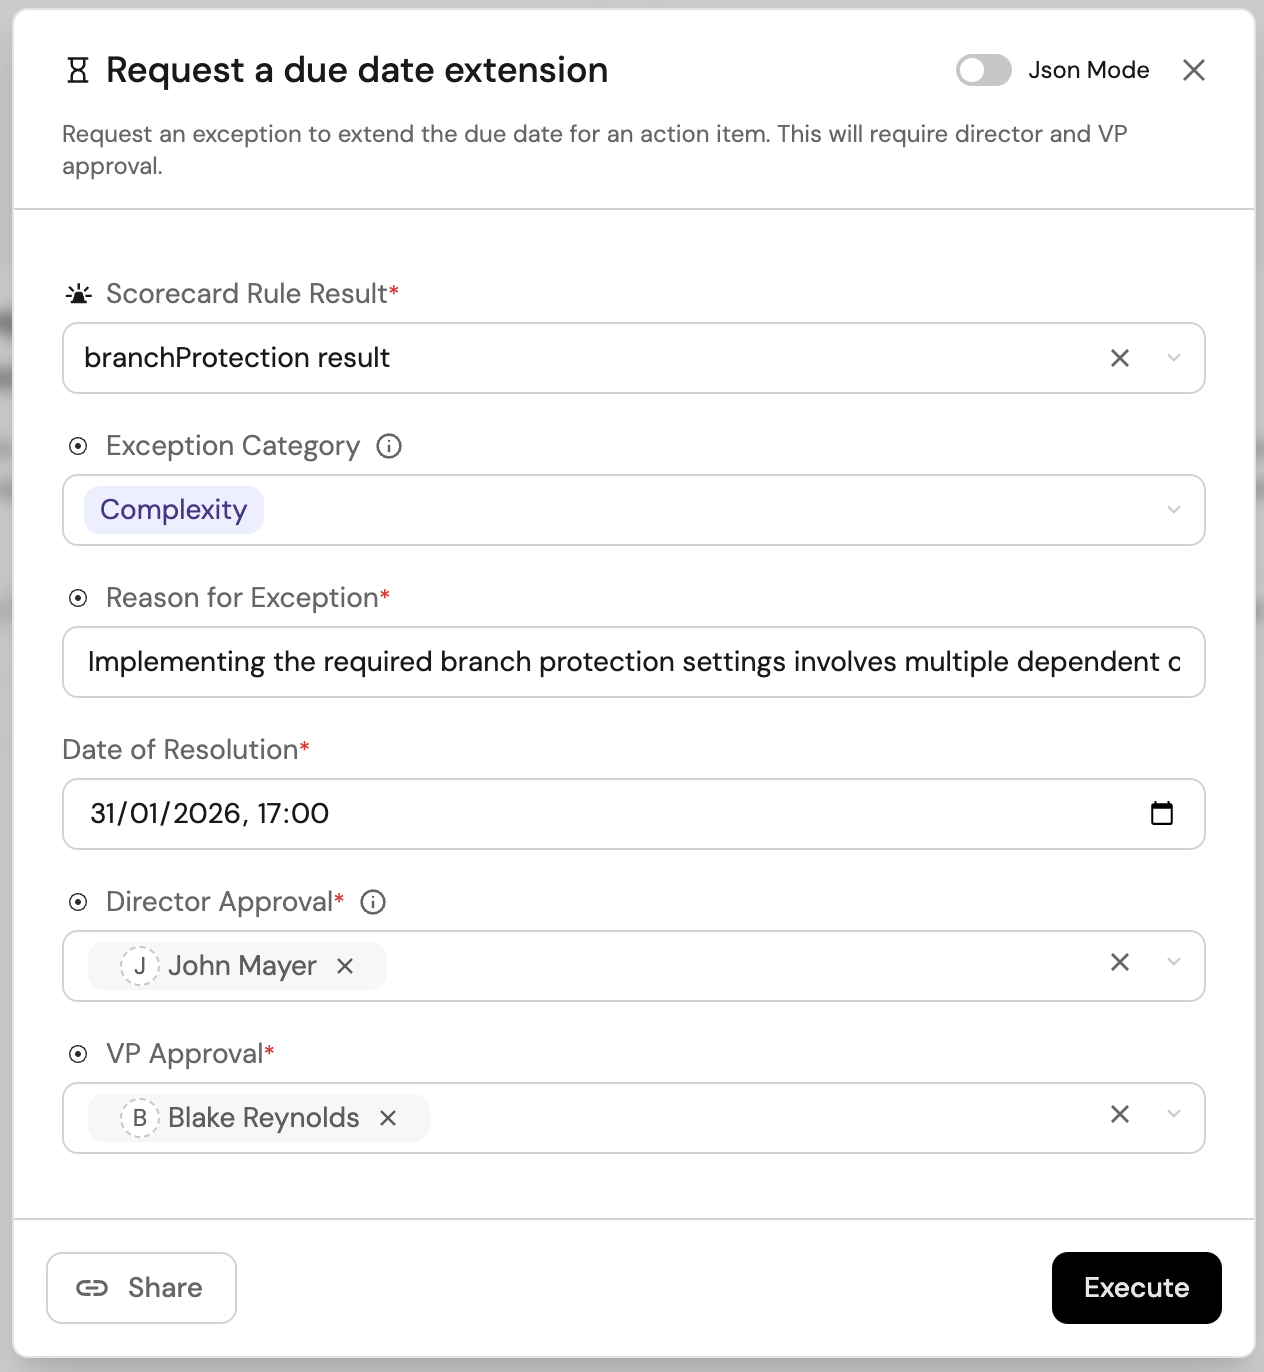
Request a due date extension
When an action item's due date is approaching and the issue cannot be resolved in time, teams can use this self-service action to request an extension from management. The action creates an exception request that goes through an approval workflow (director and VP approval).
This action is particularly useful when:
- The due date is almost here and the action item has not been addressed yet.
- External dependencies or resource constraints prevent timely remediation.
- Additional time is needed to properly address the issue.
For the following self-service action we will need to add another blueprint:
-
Navigate to the Builder page.
-
Click on the
+ Blueprintbutton. -
Click on the
{...} Edit JSONbutton in the top right corner of the window. -
Copy and paste the following JSON configuration into the editor:
Exception request blueprint (click to expand)
{
"identifier": "exception_request",
"description": "Represent all exceptions requested for open action items",
"title": "Exception request ",
"icon": "Clock",
"schema": {
    "properties": {
    "justification": {
        "icon": "BlankPage",
        "type": "string",
        "title": "Justification "
    },
    "director_status": {
        "icon": "DefaultProperty",
        "title": "Director Approval Status",
        "type": "string",
        "default": "Pending",
        "enum": [
        "Approved",
        "Not Approved",
        "Pending"
        ],
        "enumColors": {
        "Approved": "green",
        "Not Approved": "red",
        "Pending": "yellow"
        }
    },
    "vp_approved": {
        "icon": "DefaultProperty",
        "title": "VP Approval Status",
        "type": "string",
        "default": "Pending",
        "enum": [
        "Approved",
        "Not Approved",
        "Pending"
        ],
        "enumColors": {
        "Approved": "green",
        "Not Approved": "red",
        "Pending": "yellow"
        }
    },
    "category": {
        "type": "string",
        "title": "Category",
        "enum": [
        "Complexity",
        "No resources",
        "MSFT dependencies"
        ],
        "enumColors": {
        "Complexity": "blue",
        "No resources": "lightGray",
        "MSFT dependencies": "orange"
        }
    },
    "requested_due_date": {
        "type": "string",
        "title": "Requested Due date",
        "icon": "Clock",
        "format": "date-time"
    }
    },
    "required": []
},
"mirrorProperties": {
    "current_due_date": {
    "title": "Current Due Date",
    "path": "requirement.due_date"
    },
    "scorecard": {
    "title": "Scorecard",
    "path": "action_item.rule.scorecard.$title"
    }
},
"calculationProperties": {
    "current_status": {
    "title": "Current Status",
    "icon": "DefaultProperty",
    "calculation": "if .properties.director_status == \"Pending\" and .properties.vp_approved == \"Pending\" then     \"Pending Director and VP\"   elif .properties.director_status == \"Pending\" then     \"Pending Director\"   elif .properties.vp_approved == \"Pending\" then     \"Pending VP\"   elif .properties.director_status == \"Not Approved\" or .properties.vp_approved == \"Not Approved\" then     \"Not Approved\"   else     \"Approved\"   end",
    "type": "string",
    "colorized": true,
    "colors": {
        "Pending Director and VP": "orange",
        "Pending Director": "yellow",
        "Pending VP": "yellow",
        "Approved": "green",
        "Not Approved": "red"
    }
    }
},
"aggregationProperties": {},
"relations": {
    "requirement": {
    "title": "Requirement ",
    "target": "_rule",
    "required": false,
    "many": false
    },
    "approving_v_ps": {
    "title": "Approving VPs",
    "target": "_user",
    "required": false,
    "many": true
    },
    "action_item": {
    "title": "Rule Result",
    "target": "_rule_result",
    "required": false,
    "many": false
    },
    "approving_directors": {
    "title": "Approving Directors",
    "target": "_user",
    "required": false,
    "many": true
    }
}
} -
Click
Save.
To add the self-service action:
-
Head to the self-service page.
-
Click on the
+ New Actionbutton. -
Click on the
{...} Edit JSONbutton. -
Copy and paste the following JSON configuration into the editor:
Self-service action definition (click to expand)
{
"identifier": "request_a_due_date_extension",
"title": "Request a due date extension",
"description": "Request an exception to extend the due date for an action item. This will require director and VP approval.",
"trigger": {
    "type": "self-service",
    "operation": "DAY-2",
    "userInputs": {
    "properties": {
        "reason_for_exception": {
        "icon": "DefaultProperty",
        "type": "string",
        "title": "Reason for Exception",
        "minLength": 10,
        "maxLength": 500
        },
        "exception_category": {
        "icon": "DefaultProperty",
        "type": "string",
        "title": "Exception Category",
        "description": "This will help the user to auto select the reason for exceptions",
        "enum": [
            "Complexity",
            "No resources",
            "MSFT dependencies"
        ],
        "enumColors": {
            "Complexity": "purple",
            "No resources": "red",
            "MSFT dependencies": "green"
        }
        },
        "date_of_resolution": {
        "type": "string",
        "title": "Date of Resolution",
        "format": "date-time"
        },
        "director_approval": {
        "icon": "DefaultProperty",
        "type": "array",
        "title": "Director Approval",
        "description": "For now we will have the requestor manually select the approver, but in the future we want Port to automatically select the next level manager for approval.",
        "items": {
            "type": "string",
            "format": "user"
        }
        },
        "vp_approval": {
        "icon": "DefaultProperty",
        "type": "array",
        "title": "VP Approval",
        "items": {
            "type": "string",
            "format": "user"
        }
        }
    },
    "required": [
        "reason_for_exception",
        "date_of_resolution",
        "director_approval",
        "vp_approval"
    ],
    "order": [
        "exception_category",
        "reason_for_exception",
        "date_of_resolution",
        "director_approval",
        "vp_approval"
    ]
    },
    "blueprintIdentifier": "_rule_result"
},
"invocationMethod": {
    "type": "UPSERT_ENTITY",
    "blueprintIdentifier": "exception_request",
    "mapping": {
    "identifier": "{{ .entity.identifier + \"_exception\"}}",
    "title": "{{ .entity.title + \"_exception\"}}",
    "properties": {
        "justification": "{{.inputs.reason_for_exception}}",
        "requested_due_date": "{{.inputs.date_of_resolution}}",
        "category": "{{.inputs.exception_category}}"
    },
    "relations": {
        "action_item": "{{ .entity.identifier }}",
        "requirement": "{{ .entity.relations.rule }}",
        "approving_directors": "{{.inputs.director_approval}}",
        "approving_v_ps": "{{.inputs.vp_approval}}"
    }
    }
},
"requiredApproval": false,
"icon": "HourGlass"
} -
Click
Save.
Below is an example for a filled form for an exception request:
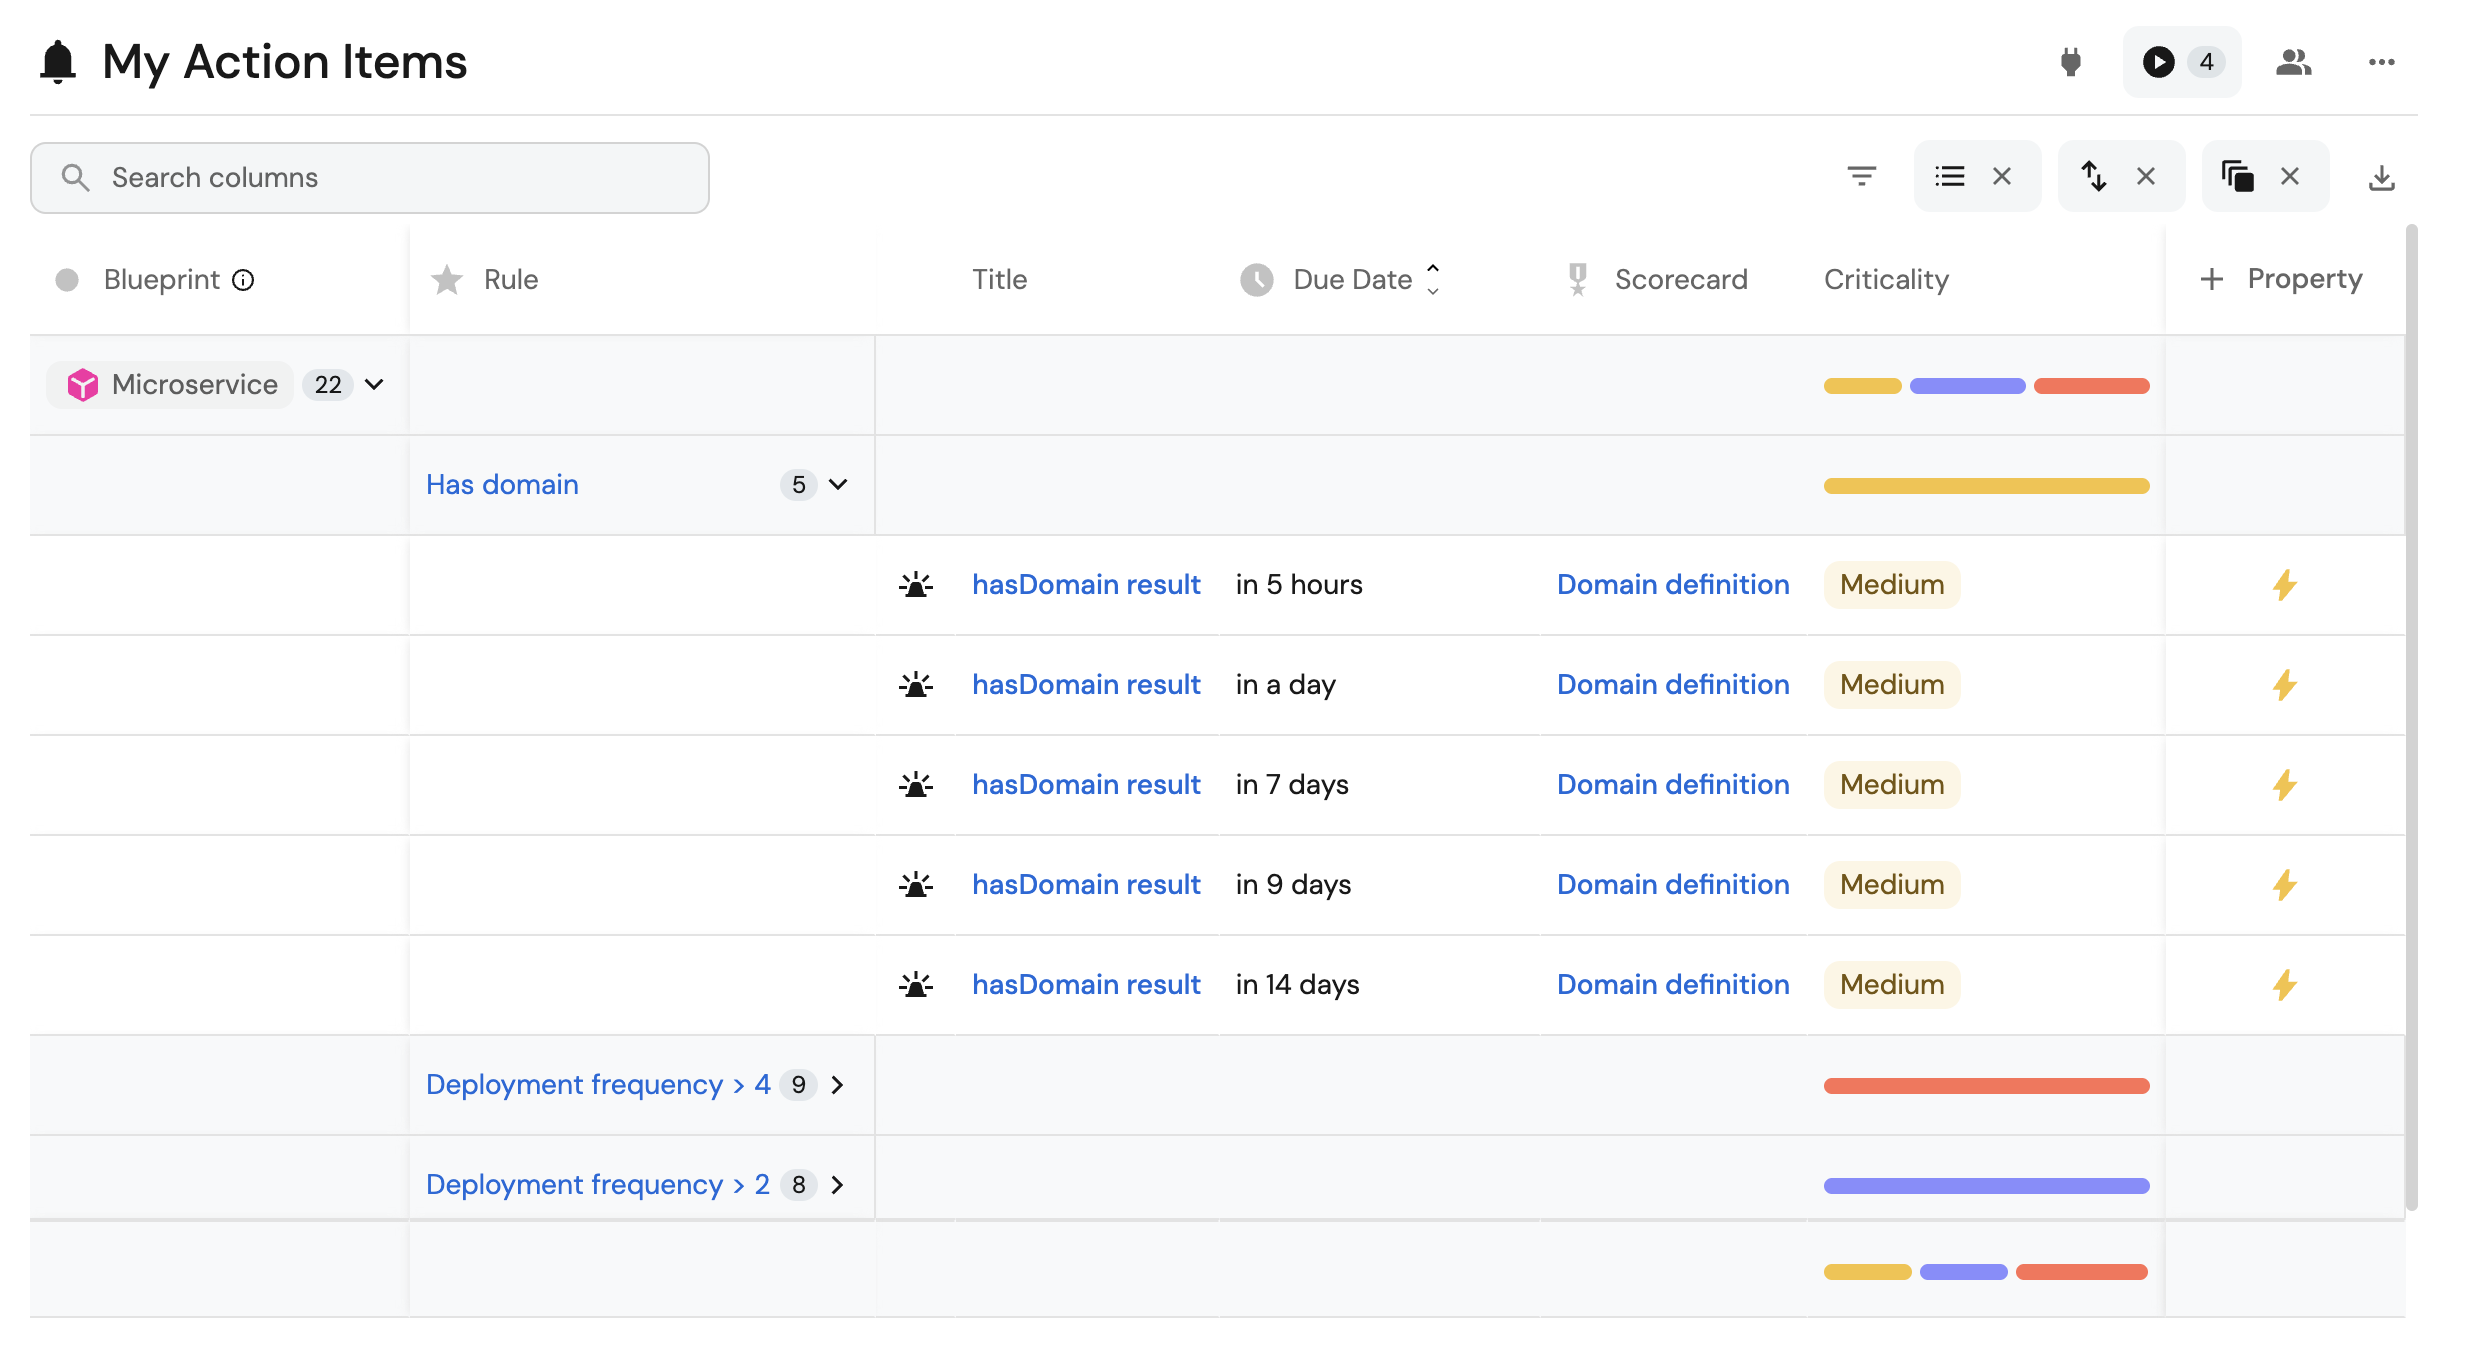
Visualize and track action items
To help teams stay accountable and proactive, you can create an action items dashboard that provides a centralized view of all failed rule results, which are the items that require remediation before SLA deadlines are missed.
This dashboard is built on the Scorecard rule result blueprint and groups results by blueprint and rule, making it easy to identify and prioritize issues.
Who can benefit from this dashboard?
- Developers: Can quickly see what issues need to be addressed for their services, prioritize work based on due dates and criticality, and track their remediation progress.
- Team leaders: Can monitor team-wide action items, identify patterns across services, and ensure timely remediation. They can use the dashboard to send Slack messages to developers, on-call engineers, or owning teams when action items require attention.
Before setting up the dashboard, make sure to add the Due date property to the Scorecard rule result blueprint as described in the extended scorecard rule result blueprint section above.
Dashboard setup
-
Navigate to your Software Catalog page.
-
Click the + New button in the sidebar on the left side of the page.
-
Select New catalog page from the dropdown menu.
-
In the modal that appears, configure the following settings:
- Title: Enter
My Action Items. - Identifier: Enter
my_action_items. - Blueprint: Select
Scorecard Rule Resultfrom the dropdown.
- Title: Enter
-
Set up the initial filter to show only rule results that have failed:
- Click on filters, then
+ Filter. - Select the
Resultproperty. - Choose the operator
=. - Set the value to
Not passed.
Or copy and paste the following JSON code:
{
  "combinator": "and",
  "rules": [
    {
      "property": "result",
      "operator": "=",
      "value": "Not passed"
    }
  ]
}
Then click
Save. - Click on filters, then
-
Click
Createto save the dashboard.
After creating the dashboard, group by Blueprint and Rule.
This configuration creates a view where action items are organized by the target blueprint and the specific rule that failed, making it easy to identify which entities have issues and what they are.
This table can also be added to a dashboard as a table widget with the same configurations. This allows you to embed the action items view directly into other dashboards.